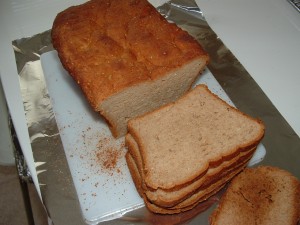
 Here’s the first gluten free and egg free brown bread that my family and I liked. Of course, like many of my earlier attempts, this recipe has no potatoes in it – not in starch or flour form.
After so many failed attempts, this one was one of those recipes that made me think it is possible to create bread without gluten, potatoes or eggs.
Over the years, I have made variations on this brown bread recipe, in an effort to make it taste better and/or have a better texture. I will be sharing those variations and their results on this site as well.
In the meantime, you may want to try your hand at gluten free and eggless bread making with this recipe.
Z’s Gluten Free Brown Bread 1
What we will need to have:
1/3 + 1/2 cup brown rice flour
2/3 cup garbanzo and fava bean flour mix
1/2 cup rice bran (make sure it has not gone rancid or you will ruin bread taste)
1/2 cup tapioca starch flour (cassava starch flour**)
1/2 cup arrowroot starch flour or cornstarch
1/4 cup sorghum flour
1 tablespoon xanthan (or guar) gum
1/4 cup sesame seeds (optional)
1/2 teaspoon salt
1/2 cup dry milk powder (non-instant)
1 tsp. cocoa powder
2 tsp. baking powder
1 tsp. white sugar
1 pkg. active dry yeast (7 g.)
1-1/2 cups warm water
1 recipe 2-egg replacer*
3 tablespoons veg. or very light coconut oil
3 tablespoons honey (1 tbsp. separated)
2 teaspoons cider vinegar or 1 tsp. rice vinegar
* 2-egg replacer recipe
1 tablespoon arrowroot or cornstarch
1 tablespoon tapioca
1/4 tsp. baking powder
2 teaspoons cooking oil
1/2 cup warm water not boiling
—mix above ingredients in a cup; beat to incorporate air into the mixture
or,
1 tablespoon flaxmeal (ground flax seeds)
1/4 tsp. baking powder (BP)
2 tsp. cooking oil
1/2 cup hot water
—mix flaxmeal, BP, oil and water. once mixed let cool a bit until it is just warm not hot.
What we need to do:
- Grease a 9×5 bread pan
- In a bowl or a 2 cup measuring vessel containing the 1 1/2 cup warm water, stir in 1 tablespoon honey and yeast. proof in a draft free place for approx. 10 minutes.
- In another bowl or 8 cup measuring vessel mix well, first set of dry ingredients (all the flours/starches, sesame seeds (if using), rice bran, 2 tsp. baking powder, salt, white sugar, dry milk and cocoa powder). This is your dry mixture.
- When the yeast is done proofing (foam has risen to close to a half inch)–in a large bowl ( or your stand mixer’s mixing bowl), place egg replacer mixture, the rest of the honey, 3 tablespoons oil and 2 teaspoons vinegar. Beat , until a bit bubbly ( a sign that air is properly incorporated in the mix). Turn mixer off. Add the yeast mixture and beat again for about a minute. (Remember to always turn off your mixer after each addition)
- Add your dry mixture. Stir in with a spatula. Beat on low until just mixed, then beat on high for 3 minutes.
- Spoon into your greased and prepared bread pan. Smooth top with your fingers (wet your fingers in warm water first so dough does not stick).
- Cover loosely with oiled plastic wrap and let rise in a warm place (not hot) for between 25-35 minutes just until the dough rises to the top of your pan or might let it rise about a half inch higher. Just do not let it rise too tall or it will fall during baking.
- In the last 15 minutes of rising, pre-heat oven to 375 degrees fahrenheit (rack should be in the middle or third slot from bottom)
- When dough has risen enough, remove plastic wrap and place pan inside pre-heated oven.
- Bake uncovered for 15 minutes then loosely cover with foil for the next 40-45 minutes remaining in the bake time.
Bread will smell done-do not worry if its looks a little over-browned in some spots. Take bread pan out of oven and let pan rest on its side for 5 minutes. Remove bread from pan and let it continue to rest on its side on a wire rack to cool completely.
Slice and enjoy this homemade bread! A serrated knife works really well. an electric one works the best.
Notes!!!
** be sure you buy a trusted brand
Bread may crack a little bit on its top.
No matter how tempting it is–DO NOT slice bread until it is completely cooled. The nature of gluten free/eggfree bread is such that the cooling time is necessary for the bread to finish cooking and setting. Slicing b4 it is completely cooled off will result in a sticky mess.
If you are not allergic to eggs. You may use 2 eggs to cook this bread but eggs must be room temperature (not cold or hot or warm) and 2 tablespoons more of water may be necessary to get desired consistency of dough.